TerraClearMobile Quick
Reference Guide
Introduction
TerraClearMobile allows you to easily view a TerraClear rock map and aids in-field navigation when picking rocks in farm fields. TerraClearMobile may be used in conjunction with the TerraClear Rock Picker or to pick rocks by more conventional means.
TerraClearMobile uses your mobile device’s native location services to guide a vehicle to a rock on the map. Thus, your device must be GPS enabled for in-field navigation.
One-Time Device Setup
- Launch the Apple App Store or Google Play app, search for “TerraClearMobile” and tap GET or INSTALL to install
- When install is complete, tap Open to launch TerraClearMobile
- Enter Username (email address) and Password
- Select Production environment (not Staging or Development)
- Tap Sign In button
If location permission is ever turned off for TerraClearMobile in your device Settings, you may be prompted to allow TerraClearMobile to ACCESS_FINE_LOCATION for GPS integration. Tap OK.
View a Rock Map
- If not already logged in, log into the Production environment (not Staging or Development)
- All completed rock maps for which you have access display
- If the rock map has not been previously downloaded, tap the download icon to the right of the Order Name. A checkmark icon will display when the download is complete.
- Once downloaded, tap the Order name to open the rock map.
- Zoom out to view a rock heat map (Figure 1) by touching two fingers on the touch screen and move them together
- Zoom in to view individual rock locations (Figure 2) by touching two fingers on the touch screen and move them apart
- Tap the collapsed menu icon in upper left corner (≡) of rock map
- Select Rock Maps
- Select a new rock map to (download and) view

Figure 1: Heat Map View

Figure 2: Rock Dot View
In-Field Navigation and Rock Picking
- Tap the collapsed menu icon (≡) in upper left of the Rock Maps screen
- Tap Settings
- Toggle Automatically Pick Rocks ON (default is ON)
- Set Picker Swath Width as follows:
- 8’ for picking implements
- 20’ for scanning and hand picking a field by a single individual
- 40’ for scanning and hand picking a field by a picking team
- Set Implement Type to offset tow behind, tow behind or front mount
- Based on your implement type, enter the X and Y offset (in inches)
- For Front Mount implements, the X-value is the distance from the middle of the picker to your GPS source
- Enter a negative value if the GPS receiver is to the left of the center of the picker
- Enter a positive value if the GPS receiver is to the right of the center of the picker
- Enter 0 for X if the GPS receiver is centered with the picker
- For Front Mount implements, the Y-value is the distance from the front of the picker to your GPS source
- Enter a negative value if the GPS receiver behind the picker
- Enter 0 for X if the GPS receiver is mounted on the front of the picker
- For Tow Behind implements, the X-value is the distance from the middle of the picker to your GPS source
- Enter a negative value if the GPS receiver is to the left of the center of the picker
- Enter a positive value if the GPS receiver is to the right of the center of the picker
- Enter 0 for X if the GPS receiver is centered with the picker
- For Tow Behind implements, the Y-value is the distance from the front of the picker to your GPS source
- Enter a positive value if the GPS receiver is in front of the picker
- Enter 0 for X if the GPS receiver is mounted on the front of the picker
- For Offset Tow Behind implements, the X-value is the distance from the middle of the picker to your GPS source
- Enter a negative value if the GPS receiver is to the left of the center of the picker
- Enter 0 for X if the GPS receiver is centered with the picker
- For Offset Tow Behind implements, the Y-value is the distance from the front of the picker to your GPS source
- Enter a positive value if the GPS receiver is in front of the picker
- Enter 0 for X if the GPS receiver is mounted on the front of the picker


GPS Positional Accuracy
The GPS state and accuracy is listed on the GPS status bar at the top of the rock map. The status bar will be green if location accuracy is less than 5 meter (5m), yellow if 5m or more and red if your device’s GPS receiver cannot connect to satellites. Greater accuracy can be achieved by augmenting phone location services with low cost 3rd party external GPS receivers such as Bad Elf 2200 GPS Pro or Garmin GLO 2 GPS GLONASS Receiver. Apple devices running iOS 14 and above do not benefit from low cost augmentation devices as their built-in GPS receiver provides equivalent GPS accuracy.
Filter Rock Size
To filter rocks displayed on the rock map, tap the Settings icon on the rock map and use slider bar to adjust size of rocks displayed (Figure 3). Note that when Outside Mode is OFF, rocks are indicated as color coded dots based on size.
Show Suggested Route
TerraClearMobile Suggested Route feature displays the shortest path to travel through the field to pick rocks based on the current rock size and picker swath width settings. The suggested route is based on estimated speed when traveling through the field between rocks and time to pick the rocks, but does not include the time to dump rocks. This is an estimate only and may not reflect actual picking time.
To display the suggested route:
- Tap the Settings icon on the rock map
- Toggle Show Suggested Route ON
- Tap Done at the top of the dialog
A route will now display on the rock map which you can follow to minimize the time spent driving to rocks.
Things to Note:
- The suggested route will navigate around exclusion zones (marked in red on the map) in the field unless the exclusion zone spans the entire width of the field, in which case the route will travel through the exclusion zone.
- The wider the picker swath width setting, the shorter the path. However, if the picker swath width is set to 20’ or 40’ for hand picking, rocks may be farther from the suggested route line.
- If Show Suggested Route is toggled OFF, the estimated time to pick a field using the suggested route still displays in the rock map status bar.
Track Traveled Path
When Show Track Path is toggled ON in app level settings, the Track Path feature is activated. When you are within the field boundary (geofence), it triggers the Traveled Path, a gray line which tracks the path the picking vehicle has taken through the field (Figure 4).
- You may suspend the Traveled Path to dump rocks by tapping the (■) icon on the rock map. After rocks are dumped, tap the (▶) icon on the rock map to resume the Traveled Path.
- Tap the (→) icon to display the compass heading of the vehicle
- You can automatically hide rocks in the Traveled Path to indicate rocks have been picked by tapping the Settings icon and toggle Show Picked Rocks OFF.

Figure 3: Filter rock size

Figure 4: Traveled path
View Aerial Images of Rocks
As you pick rocks, you can view the image of a rock as captured by the aerial survey. To view the aerial image, tap a dot on the rock map. If available, the aerial image with the rock surrounded by a yellow bounding box displays, as well as the rock size (Figure 5). Other rocks in the same image are identified by blue bounding boxes.

Figure 5: Aerial Image

Figure 6: Tag Rock
Syncing Information During Picking Session
- Tap the collapsed menu icon (≡) in the upper left of the rock map
- Tap Sync. A progress spinner will display while syncing
App Level Settings
- Tap the collapsed menu icon (≡) in upper left of All Orders screen
- Select Settings
- Adjust app behavior as follows:
- Toggle Show Track Path OFF to stop the display of the Traveled Path on the rock map as you traverse the field
- Toggle Auto Sync OFF to disable automatic upload of traveled paths, tags and picked rock information to TerraClear
- Toggle Automatically Pick Rocks OFF to disable the automatic tagging of rocks when your mobile device is within 6’ of a rock
- Toggle GPS Enabled OFF to stop tracking your location within a field. This will also prevent in-field navigation.
- GPS Source should be set to Phone Location to use location services or augmented location services such as Bad Elf 2200GPS Pro or Garmin GLO 2 GPS GLONASS Receiver
Customer Support
Our team is here for you! Contact TerraClear Customer Support by phone at 1-425-274-2905.
FAQs
Apple Devices: App Store
Android Devices: Google Play
Yes. You can use the TerraClear Tools web application at TerraClear Tools. Your login credentials are the same for both the web application and the mobile app.
- You should have received an email with the subject “Your TerraClear temporary password” containing your login credentials (username and password). Please check your junk folder if you cannot find this email in your inbox.
- If you need to reset your password, open the TerraClearMobile app, tap the “Forgot Password” link on the sign-in screen, and follow the prompts.
- We recommend leaving the mobile app logged in, even when not in use.
Yes, you can use the same login and password on multiple devices.
Reach out to your TC representative to request multiple user accounts.
Open the TerraClearMobile app, tap the “Forgot Password” link on the sign-in screen, and follow the prompts.
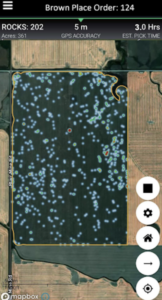
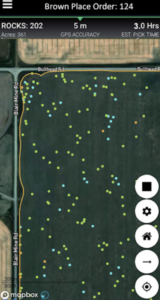
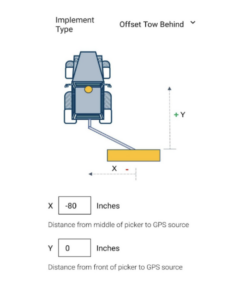
Location services on mobile devices provide a range of GPS accuracy, typically within 4.5m - 7.6m (15 to 25 feet). GPS accuracy can be improved using relatively inexpensive augmentation devices such as Garmin Glo 2 GPS and Bad Elf 2200 GPS Pro, which provide accuracy up to 2.5m - 3m (~9 feet). Apple devices running iOS 14 and above do not benefit from low cost augmentation devices as their built-in GPS receiver provides equivalent GPS accuracy.
For more precise location accuracy, TerraClear recommends the Juniper Geode GNS3m Receiver (multi-frequency). This bluetooth receiver supports both Apple and Android devices, achieves up to 10cm accuracy (~4 inches) and is easily set up.
Customers should read product specifications to confirm GPS accuracy for other devices, taking care to look for kinematic accuracy (when device is in motion) rather than stationary accuracy.


